How to Self-Host MCP Servers with n8n

Having custom tooling for your LLM usage provides a personalized experience that is remarkably valuable for tailored personal and professional use. After following this post you'll have a tinkerer's old friend, a Raspberry Pi, wired up to quickly build useful capabilities right into the chat app of your choosing.
🥧 Any flavor of Linux will do. You don't need a raspberry pi to end up with a working solution
To spark your imagination... Here is a super quick vibe code looking for interesting Coinbase phishing pages using Copilot, Sonnet 4, an n8n MCP server with a urlscan.io search tool.
Finding Phishing Pages with MCP YouTube Video
What You'll Need
- Linux command line basics
- Docker basics
- A Linux host – We'll be using a Raspberry Pi
- A Cloudflare account and a domain managed by Cloudflare
- Github Copilot or any LLM Chat App with Custom MCP Support
But first a little background...
What is MCP?
MCP (Model Context Protocol) is an open, open-source standard that lets AI apps like Claude or ChatGPT connect to external tools, data sources, and workflows through a common interface—often described as a “USB-C for AI.” It defines a client-server protocol and schemas so LLMs can request capabilities from MCP servers (files, databases, web search, etc.) in an interoperable way across platforms.
Simply put another way; MCP allows LLMs to find and call external functions.
What is n8n?
n8n is an open source workflow automation platform for building visual, node-based workflows that connect apps, APIs, and data—self-hosted or in the cloud. It offers hundreds of integrations and AI-ready nodes so teams can orchestrate complex automations end-to-end.
If you've used Tines before you'll be at home with n8n. If not, then get ready to enjoy working at the rapid pace of no-code builders.
Link to n8n.io
Self-Hosting n8n with a Raspberry Pi
Shoutout to NetworkChuck who put together an initial tutorial that we're building off of. To get a high-level overview I suggest watching his video. However, I ran into some issues he didn't address and had to deviate from his provided configs to get things up and running.
NetworkChuck n8n YouTube Video
Setting up the Cloudflare Tunnel
A Cloudflare Tunnel is going to enable public access to our locally hosted n8n instance. This is critical since the vast majority of use cases you'll have with n8n, including our MCP server, will require a publicly exposed endpoint for another service to hit.
To kick us off we're going to assume you already have SSH access to the Linux host you'll be installing software on. Once you're on the host let's get some Cloudflare utilities installed.
🥧 Not on a Pi? Find your flavor in Cloudflare's docs
# Add cloudflare gpg key
sudo mkdir -p --mode=0755 /usr/share/keyrings
curl -fsSL https://pkg.cloudflare.com/cloudflare-main.gpg | sudo tee /usr/share/keyrings/cloudflare-main.gpg >/dev/null

# Add this repo to your apt repositories
echo 'deb [signed-by=/usr/share/keyrings/cloudflare-main.gpg] https://pkg.cloudflare.com/cloudflared any main' | sudo tee /etc/apt/sources.list.d/cloudflared.list

# install cloudflared
sudo apt-get update && sudo apt-get install cloudflared
Install cloudflared
Now we'll pop over to the Cloudflare Zero Trust Dashboard to start configuring the tunnel.
- Log in to Zero Trust ↗ and go to Networks > Tunnels.
- Select Create a tunnel.
- Choose Cloudflared for the connector type and select Next.
- Enter a name for your tunnel. Something like:
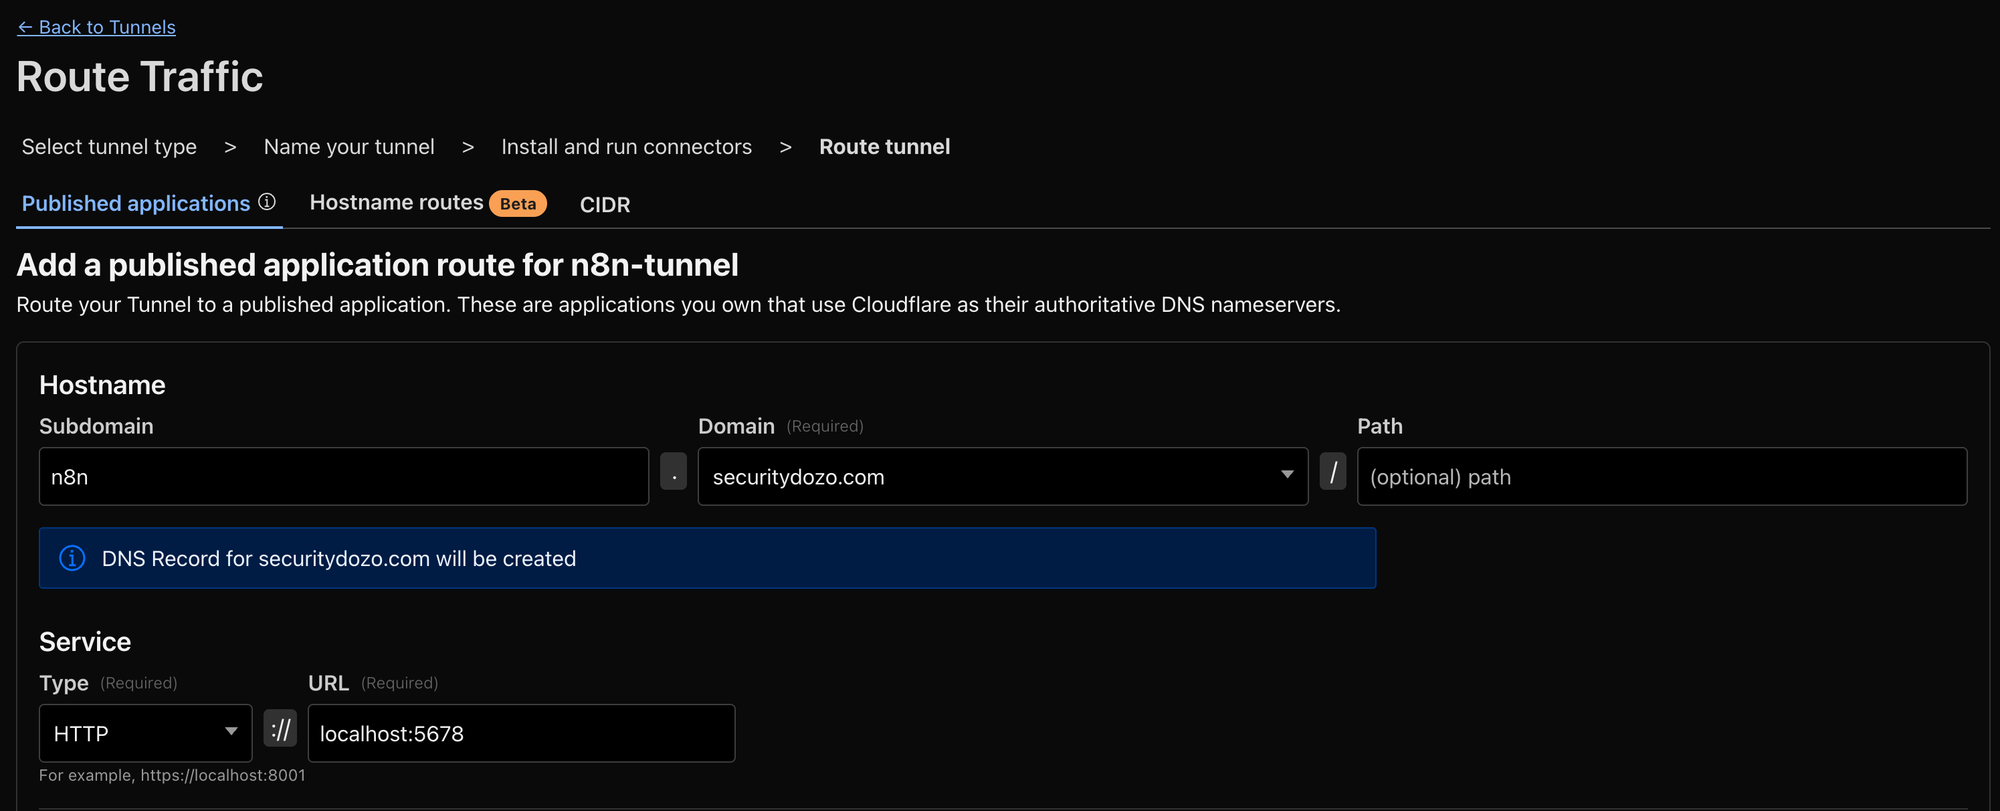
n8n-tunnel - Now you'll see the option to connect your host to Cloudflare with a command that looks like this
sudo cloudflared service install eyJhIjo...... Copy and execute it... Your host will now show up as connected on the Cloudflare dashboard. - Select the domain and optional subdomain you'd like to use for your n8n instance. Additionally, use
http://localhost:5678for the Service destination. Reference image below 👇
🔑 The cloudflared service we installed earlier is going to be maintaining an encrypted tunnel to Cloudflare's infra. This includes providing TLS for connecting to n8n. However, the traffic between localhost and the n8n Docker container will be unencrypted. I ran into a number of certificate issues and ultimately decided the risk tradeoff wasn't worth it for me. If it's important to you please let me know how you set it up!
You should now see a Healthy connection on the Tunnels dashboard!
Installing n8n
Now that we've established an encrypted tunnel to Cloudflare we need to connect the http://localhost:5678 defined in our tunnel to a local hosted n8n instance.
Docker
We're going to be running n8n via Docker Compose. The official n8n Docker Compose docs can be found here. However, as mentioned previously we'll need to deviate from it slightly for our purposes.
First up – Install Docker.
 curl -fsSL https://get.docker.com -o get-docker.sh
 sudo sh get-docker.sh
Install Docker
✍️ Note: You may feel more comfortable getting the proper Docker managed repos configured instead of piping curl to a bash script. I chose this method for simplicity.
After Docker is installed we're going to create the directory structure to house the configuration files and a Docker volume for n8n data persistence.
mkdir n8n && cd n8n && mkdir local-files && touch .env compose.ymlConfigure local environment for n8n
With the directory structure in place let's configure n8n. This compose.yml file differs slightly from the official compose file as it strips out the traefik container reverse proxy for TLS. We do this because the Cloudflare tunnel is going to be handling the proxying for us. Cloudflared got particularly grumpy and caused a number of cert issues which I won't go into detail here.
services:
  n8n:
    image: docker.n8n.io/n8nio/n8n
    restart: always
    ports:
      - "127.0.0.1:5678:5678"
    environment:
      - N8N_ENFORCE_SETTINGS_FILE_PERMISSIONS=true
      - N8N_HOST=${SUBDOMAIN}.${DOMAIN_NAME}
      - N8N_PORT=5678
      - N8N_PROTOCOL=http
      - N8N_RUNNERS_ENABLED=true
      - NODE_ENV=production
      - WEBHOOK_URL=https://${SUBDOMAIN}.${DOMAIN_NAME}/
      - GENERIC_TIMEZONE=${GENERIC_TIMEZONE}
      - TZ=${GENERIC_TIMEZONE}
    volumes:
      - n8n_data:/home/node/.n8n
      - ./local-files:/files

volumes:
  n8n_data:
compose.yml
And last but not least, our .env . Tailor each of the fields to your particular setup. If you don't plan on using a subdomain then you can comment out that line and update the WEBHOOK_URL and N8N_HOST variables in compose.yml ☝️.
# DOMAIN_NAME and SUBDOMAIN together determine where n8n will be reachable from
# The top level domain to serve from
DOMAIN_NAME=securitydozo.com

# The subdomain to serve from
SUBDOMAIN=n8n

# The above example serve n8n at: https://n8n.example.com

# Optional timezone to set which gets used by Cron and other scheduling nodes
# New York is the default value if not set
GENERIC_TIMEZONE=Asia/Tokyo

# The email address to use for the TLS/SSL certificate creation
SSL_EMAIL=contact@securitydozo.com
.env file
For the first run I recommend running the docker compose command without -d just to catch any errors that may pop up.
sudo docker compose upExecute docker compose
If everything worked as planned you should now be greeted with a glorious n8n auth page upon visiting your personal n8n url. It's going to prompt you to create a user account with an email and password. I've already done that so mine is just the login page.
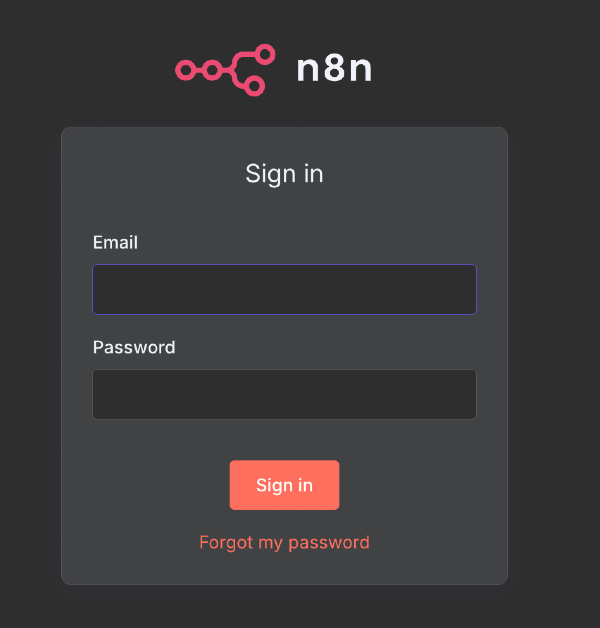
Quickly create your admin account since this instance is now public. While this does temporary expose the instance the alternative is setting up an SSH proxy to your docker container to visit the webpage and bring down the Cloudflare tunnel. If you're like me the "quickly login" approach meets the "good enough" threshold for getting started. If for some reason you're not prompted to create an account you should recreate the Docker volume and try again. A simple rm -rf local-files && mkdir local-files will do.
Follow the on-screen steps for account activation and collect your free self-hosted license key.
Pop back over the Linux host and restart the Docker container to run in the background instead of the foreground.
sudo docker compose up -dRun docker compose as a daemon
Creating the MCP Workflow
Congrats 👏! You now have the power of n8n at your fingertips. This no/low-code builder will enable you to easily chain together multiple services and workflows much quicker than coding them up.
To get up to speed on the n8n basics I'll defer once again to the NetworkChuck video linked earlier.
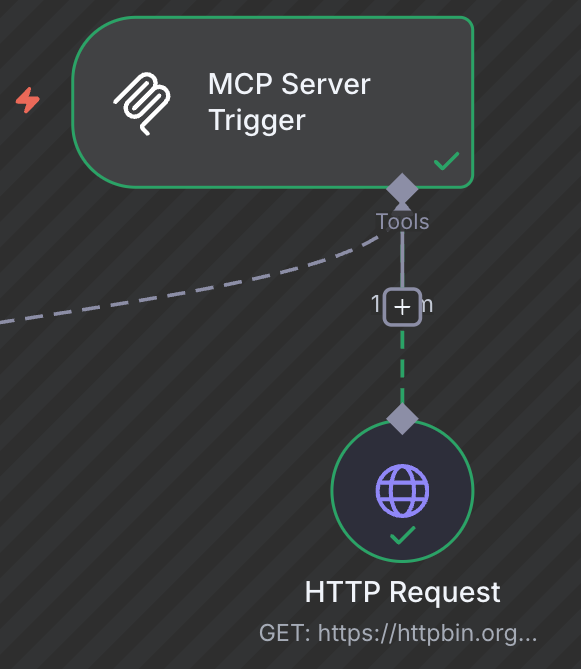
The MCP Node
Now that you have an understanding of n8n nodes in general. Take a look at this puppy...
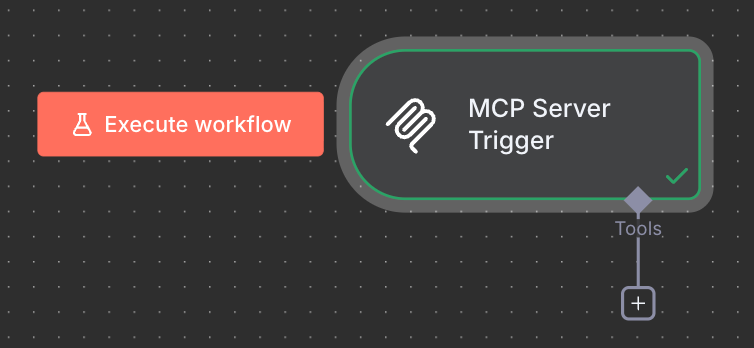
It's actually as simple as it looks. Drop in the node, configure a bearer token credential (safety first! 👷) and connect other nodes for your MCP client of choice to use as a tool.
🔑 Save your bearer token credential you created in a password manager. n8n doesn't support revealing credentials once they've been created. You'll need this credential later to authenticate the MCP client to your MCP Server Trigger.
At this point your mind is likely racing with ideas! All of these nodes, workflows, and even drop-in Python code at your disposal. We'll just be sticking to a proof of concept for now 😉
MCP Client 🤝 MCP Server
Now that you've played around with n8n and selected a tool that you want to incorporate it's time to connect it to your MCP Client of choice. I'll be covering VSCode and Copilot in this post. If Claude or Cursor is more your vibe they have very good doc support for connecting your n8n MCP server up.
‼️ At the time of publishing OpenAI does not support Authorization headers for MCP Server authentication in ChatGPT. They only support no auth or OAuth. n8n doesn't yet support OAuth for our MCP Server Trigger. Use no auth at your own personally discretion.
Whichever chat app you use you'll still want to read the Connecting to the n8n MCP Server section below to ensure n8n is ready for connections from Claude
Configure Claude Remote MCP Servers
Follow Claude's documentation to point Claude to your n8n MCP server.
Link to Claude's guide on setting up MCP servers
VSCode and Copilot
The chat.mcp.access setting controls which MCP servers can be installed and run in VS Code. Enable it. By default, all MCP servers are allowed. If you'd like more control and flexibility check out Microsoft's Docs.
Assuming you're on a Mac, use the cmd+shift+p hotkey to bring up VSCode's dev tools and search for MCP: Open User Configuration .
This will bring you to your user-wide mcp.json file where we will configure our newly created n8n MCP server. Add the following content to the config file.
{
    "inputs": [
        {
            "type": "promptString",
            "id": "n8n-mcp-api-token",
            "description": "n8n MCP API Token",
            "password": true
        }
    ],
    "servers": {
        "n8n": {
            "type": "http",
            "url": "https://n8n.securitydozo.com/mcp-test/dd4e5efa-585e-4e49-8992-2d0535f78f64",
            "headers": {
                "Authorization": "Bearer ${input:n8n-mcp-api-token}"
            }
        }
    }
}
mcp.json config file
Connecting to the n8n MCP Server
VSCode gives you some helpful intellisense to start the server. My screenshot looks a little different since I've already configured a server.

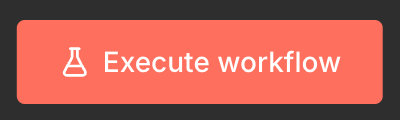
Before attempting to connect to the server we need to make sure the MCP Server Trigger is ready to accept the connection. Head over to n8n and click the big ol Execute Workflow button to listen for connections.
Clicking start in VSCode should prompt you to enter the n8n-mcp-api-token secret which VSCode will helpfully store securely for us via input variables. Paste in your n8n bearer token credential that you saved earlier and hooked up to your n8n MCP Server Trigger Node.
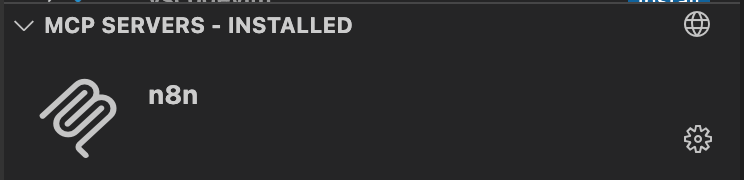
You can either start your server via the intellisense modal or, under the extensions tab, you should now see an n8n server listed.
When you right-click, or click the ⚙️, go to Configure Model Access and select the models you'd like to access the tools in your MCP server. I'd recommend selecting all of them so that you can switch between them freely.
Once you've confirmed that Copilot is able to connect to your server then swap in the production n8n url by removing the -test from your test url. Then, switch your inactive workflow to active in the upper right hand corner.
Last but not least we need to now enable the newly discovered tools in Copilot via the 🛠️ icon in the chat menu (There's probably a command to pull up this menu but I couldn't find it. Email me if you know it and I'll credit you here)
Select the tools you created to expose them in Copilot's chat.
Finally we have everything we need. Kindly ask your friendly model in the chat to use a tool it now has access to.
Hopefully you see Copilot requesting access to use the tool. Approve it. 🤞 The output of your tool call has been incorporated into the chat output and you see a workflow execution in your n8n instance 🎉
Getting the most out of n8n
My parting recommendation is to checkout the Call n8n Workflow Tool which will allow you to take other complete workflows you've built in n8n and expose them as tools via MCP to your LLM.
Member discussion